We learned all the steps to resize an image in Photoshop. Even though the steps are pretty simple and straight-forward,
it will be a daunting (or downright boring) task if we
need to resize hundreds or even thousands of images at a time. When you need to resize multiple images at once (commonly known as batch resizing), you will be glad
to know that Photoshop actually has a built-in "batch automator" to automate batch resizing of images for you.
It will take a little bit of work to set it up, but once it's set up, it will save you a lot of time from having to open, resize, and save each image file.
The tutorial below will walk you through the steps to "record" your resizing "action" and then automate your "action" using the batch automator.
Before you get started, you need to save all the image files that you want to resize under a folder (let's say C:\Photos\). Create a sub-folder called "Processed" under the C:\Photos\ folder. This is where the resized images will be stored. Now, run Photoshop and open one of the image files in the folder (C:\Photos\Desert.jpg for example):
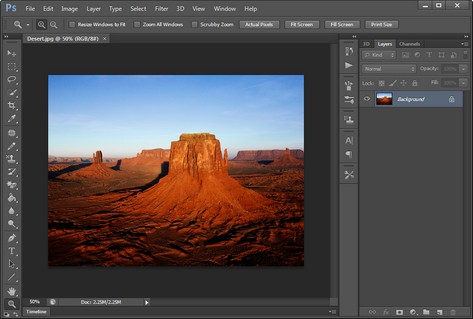
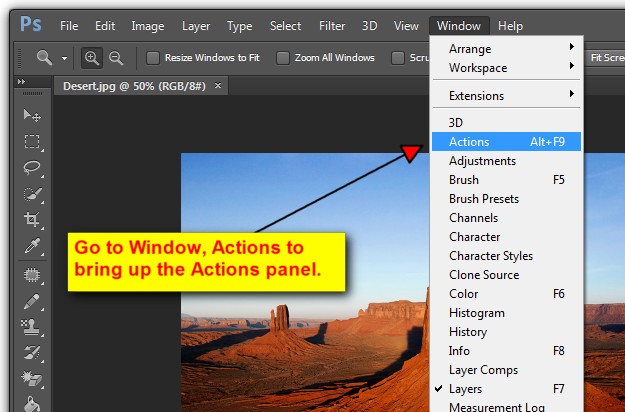
With one of the image files opened in Photoshop, open up the Actions panel by going to Window, Actions (short-cut key is Alt-F9):
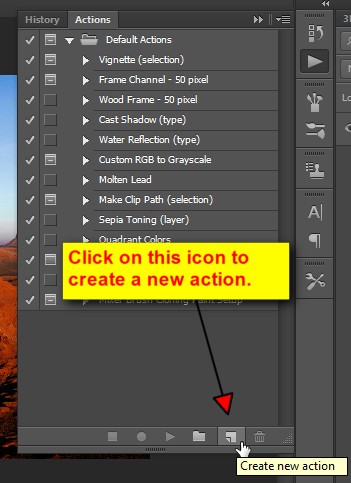
In the lower right hand corner of the Actions panel, click on the "Create New Action" icon next to the trash icon:
In the New Action dialog box, give your action a name (I named it "Resize Image"). I assigned this new action under the "Default Actions" Set (a "Set" is just a way of grouping the actions). You can also assign Function Key and Color to your action (for easy access and quick identification). I left them as default since I don't have many actions to deal with right now.
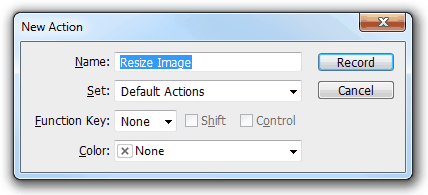
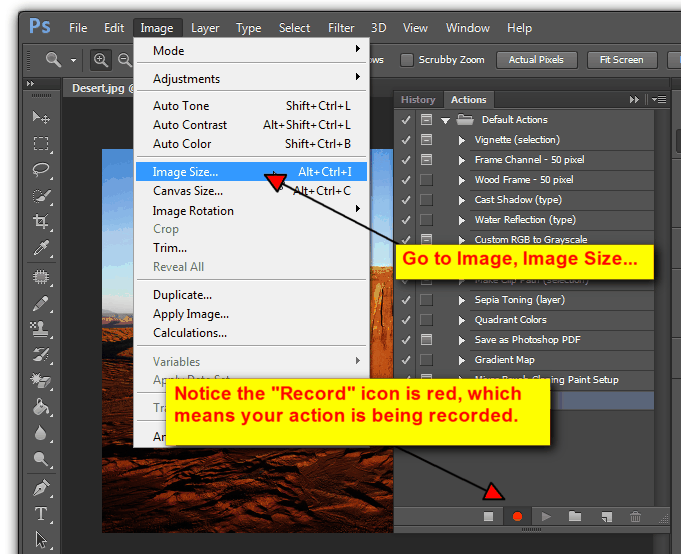
Click on the "Record" button to start recording your new action. Please be aware that all the activities that you perform with your mouse and keyboard are now being recorded from this point on, until you hit the Stop button. So be mindful of what you click on in Photoshop while you activities are being recorded.
The first step of your action is to resize the image. Go to Image, Image Size:
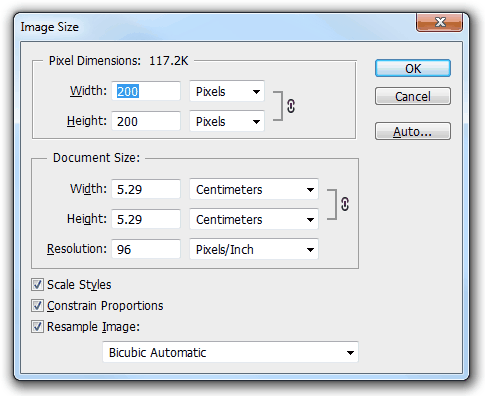
On the Image Size dialog box, specify the width and/or length that you want to resize your image to. You can resize by pixels or by percent. You can read more about resizing an image using Photoshop here. If your images have different widths and heights and you want to resize them to a specific width (maintaining aspect ratio), all you have to enter is the value for width. Leave the height alone. The height for the other images in the folder will dynamically be calculated according to the width of each image. If you want all your pictures to have the same height, just enter the height and leave the width alone. Click on "OK" when you are done:
 Go to File, Save As, and navigate to the C:\Photos\Processed\ folder that you created earlier. Leave the file name as it is and click on "Save":
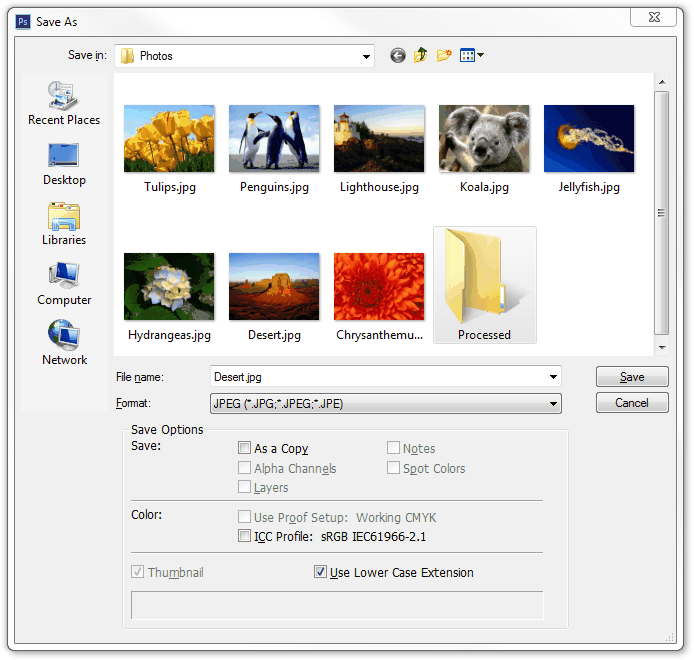
It is imperative that you leave the file name as it is or else your resized files will be overwriting themselves under the same file name. Before your image is saved, you will be prompted to choose your image quality. Choose the proper options and click on "OK" to save your image file.
Now, go to File, Close to close the file. After the file is closed, click on the "Stop" icon on the Actions panel:
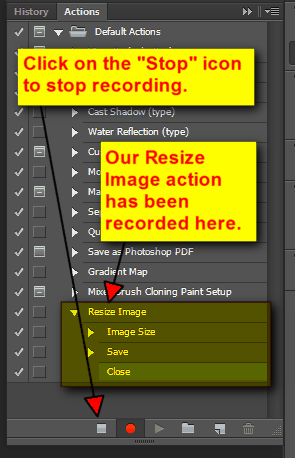
Your recording session will be stopped and you will see our Resize Image action, which comprises of Image Size, Save, and Close.
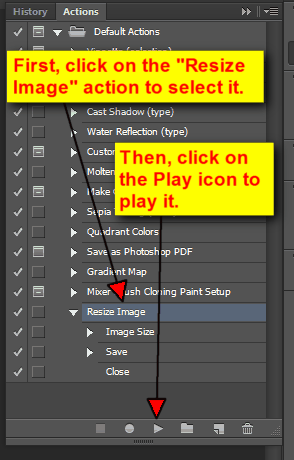
After clicking on the Play icon, your image should be resized, saved, and closed. Now, go check the C:\Photos\Processed\ folder and your resized image file should be saved there. Congratulations! That means your resizing action worked and you have successfully resized and saved your image by simply clicking on the Play icon.
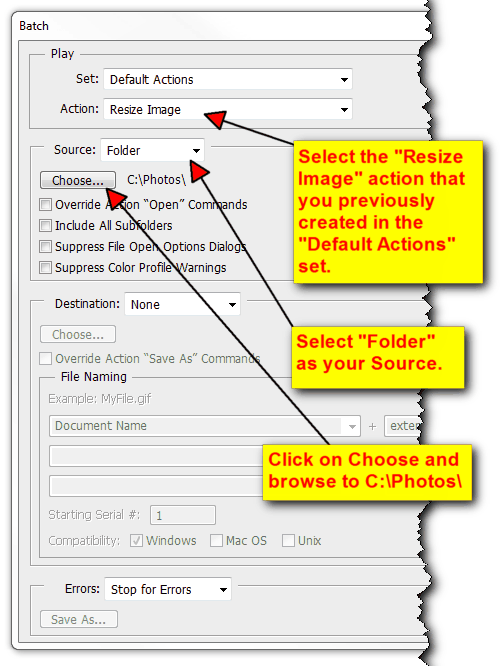
In the Play section, leave the Set as "Default Actions" and select "Resize Image" in the Action drop down list. Select "Folder" for the Source and click on the "Choose..." button to browse to C:\Photos (or wherever your pre-processed image files are located). Leave the Destination as "None" since we have already built the destination folder into our Resize Image action.
There are other fancy things that you can do (like formatting the output file name and extension, adding serial number to file name, specifying platform compatibility, error handling, etc). To keep it simple, we won't mess with any of the settings right now. You can play with these settings yourself once you get comfortable with the process later.
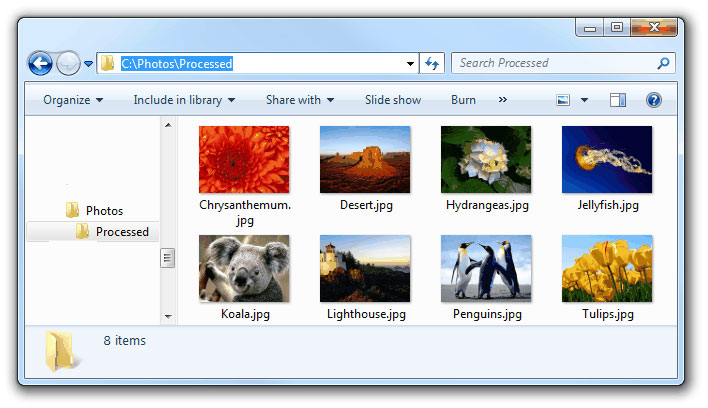
Click on the "OK" button and watch the Batch Automator plays back the action for each image in the C:\Photos\ folder. Depending on the number of images you have in the C:\Photos\ folder, it might take a few seconds for the Batch Automator to complete the process. Once the batch resizing process has been completed, you will see the resized image files in the C:\Photos\Processed\ folder:
Go ahead, click on the button below to download the batch image resizer that can save you hundreds of hours of manual work in resizing images:
Batch Image Resizer
It will take a little bit of work to set it up, but once it's set up, it will save you a lot of time from having to open, resize, and save each image file.
The tutorial below will walk you through the steps to "record" your resizing "action" and then automate your "action" using the batch automator.
Before you get started, you need to save all the image files that you want to resize under a folder (let's say C:\Photos\). Create a sub-folder called "Processed" under the C:\Photos\ folder. This is where the resized images will be stored. Now, run Photoshop and open one of the image files in the folder (C:\Photos\Desert.jpg for example):

Record Resizing Action
We will start by recoding the resizing steps (collectively called an "Action" in Photoshop) for one single image file. After the action has been created, we will play back the action using the batch automator later.With one of the image files opened in Photoshop, open up the Actions panel by going to Window, Actions (short-cut key is Alt-F9):

In the lower right hand corner of the Actions panel, click on the "Create New Action" icon next to the trash icon:

In the New Action dialog box, give your action a name (I named it "Resize Image"). I assigned this new action under the "Default Actions" Set (a "Set" is just a way of grouping the actions). You can also assign Function Key and Color to your action (for easy access and quick identification). I left them as default since I don't have many actions to deal with right now.

Click on the "Record" button to start recording your new action. Please be aware that all the activities that you perform with your mouse and keyboard are now being recorded from this point on, until you hit the Stop button. So be mindful of what you click on in Photoshop while you activities are being recorded.
The first step of your action is to resize the image. Go to Image, Image Size:

On the Image Size dialog box, specify the width and/or length that you want to resize your image to. You can resize by pixels or by percent. You can read more about resizing an image using Photoshop here. If your images have different widths and heights and you want to resize them to a specific width (maintaining aspect ratio), all you have to enter is the value for width. Leave the height alone. The height for the other images in the folder will dynamically be calculated according to the width of each image. If you want all your pictures to have the same height, just enter the height and leave the width alone. Click on "OK" when you are done:


It is imperative that you leave the file name as it is or else your resized files will be overwriting themselves under the same file name. Before your image is saved, you will be prompted to choose your image quality. Choose the proper options and click on "OK" to save your image file.
Now, go to File, Close to close the file. After the file is closed, click on the "Stop" icon on the Actions panel:

Your recording session will be stopped and you will see our Resize Image action, which comprises of Image Size, Save, and Close.
Play Back Resizing Action
Now that you have your resizing action recorded, you need to play it back to make sure that it's working as expected. Go ahead and delete the resized image file (C:\Photos\Processed\Desert.jpg), and re-open the file that you want to resize (C:\Photos\Desert.jpg). After having the file opened, go to the Actions panel and select the "Resize Image" action. Then click on the Play icon to play back the image resizing action for this particular image:
After clicking on the Play icon, your image should be resized, saved, and closed. Now, go check the C:\Photos\Processed\ folder and your resized image file should be saved there. Congratulations! That means your resizing action worked and you have successfully resized and saved your image by simply clicking on the Play icon.
Use Batch Automator to Play Back Resizing Action
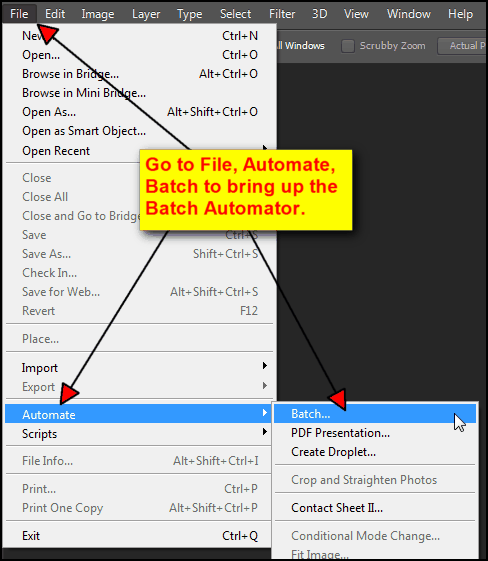
Now that we know our resizing action for a single image works, we will need to apply this action to multiple images. Let's bring up the batch automator to do the job for us by going to File, Automate, Batch:
In the Play section, leave the Set as "Default Actions" and select "Resize Image" in the Action drop down list. Select "Folder" for the Source and click on the "Choose..." button to browse to C:\Photos (or wherever your pre-processed image files are located). Leave the Destination as "None" since we have already built the destination folder into our Resize Image action.
There are other fancy things that you can do (like formatting the output file name and extension, adding serial number to file name, specifying platform compatibility, error handling, etc). To keep it simple, we won't mess with any of the settings right now. You can play with these settings yourself once you get comfortable with the process later.

Click on the "OK" button and watch the Batch Automator plays back the action for each image in the C:\Photos\ folder. Depending on the number of images you have in the C:\Photos\ folder, it might take a few seconds for the Batch Automator to complete the process. Once the batch resizing process has been completed, you will see the resized image files in the C:\Photos\Processed\ folder:

Alternative: Batch Image Resizer
If the steps above sound too complicated to set up, you might want to consider using a batch image resizer to resize the images for you. All you have to do is to specify the folder where your images are located, provide resizing settings (by pixels or by percent), and click on a button to start the resizing process. There's no need to use Photoshop to record any actions.Go ahead, click on the button below to download the batch image resizer that can save you hundreds of hours of manual work in resizing images:
Batch Image Resizer
