
QuickResizer User Guide
Last updated: June, 2022
QuickResizer is a user-friendly tool for resizing a single picture or several thousand pictures. Smaller picture files are ideal for sharing via social media, email, blogs, websites, cell phones, and other mobile devices. The built-in converter handles the input and output of high quality JPEG, GIF, BMP, PNG, and TIF picture files. Our customers have used QuickResizer to accomplish a variety of personal endeavors. This User Guide is designed to help you achieve yours. |
| GETTING STARTED |
| SYSTEM REQUIREMENTS |
| Supported Hardware |
| Intel/AMD processor. |
| Supported Operating Systems |
|
Microsoft Windows 11 Microsoft Windows 10 Microsoft Windows 8 Microsoft Windows 7 Microsoft Windows Vista Microsoft Windows XP |
| INSTALLATION |
1. Go to the QuickResizer page.
2. Click on the "Download Free Trial Now!" button.
3. Double-click to run the downloaded file QuickResizerSetup.msi.
4. You may receive a Security Warning. Click Run to continue.

5. You might be prompted to install Microsoft .Net Framework if it's currently not installed. You will need to be an Administrator of your computer to install .Net Framework.
6. Follow the rest of the installation steps to install QuickResizer.
| REGISTRATION |
The Product License form appears when QuickResizer starts.

Trial Version
If you wish to try out QuickResizer, click Close to continue. You will be able to use QuickResizer for 30 days for free.
Full Version
You will need to purchase a license after the 30 days free-trial period.
- Purchase a QuickResizer license now.
- Once purchased, you will receive a User Name and User Key via email.
- Enter the User Name and User Key into the appropriate boxes on the Product License form.
- Make sure that you are connected to the Internet and then click Register.
- The registration process cannot be initiated if you are not connected to the Internet. If you receive an error during registration, try turning off any firewalls. After registration, you can turn them back on.
- You may also experience problems if either you or your ISP (Internet Service Provider) uses a proxy server. In this case, the registration screen will prompt you for the proxy server name and port number. Enter a user name and password as required by the proxy server.
| USING QUICKRESIZER |
| RUN QUICKRESIZER |
If QuickResizer does not start automatically after installation, you can look for it using the magnifying glass icon located on the lower left corner of your desktop (right next to the Windows icon). Click on the magnifying glass icon and type QuickResizer. The QuickResizer icon should be displayed and you can click on it to run it.

You should also be able to run QuickResizer from the shortcut created on your desktop:
![]()
If all else fails, you can locate the file by typing this path into the File Explorer:
%ProgramFiles(x86)%\Ivertech\QuickResizer
There should be a file called QuickResizer.exe in the folder for you to click on. You can also right-click and create a shortcut of the exe file and place it on your desktop.
| MAIN SCREEN |
The Main Screen appears. You are now ready to use QuickResizer.

| SELECT PICTURES |
If you wish to resize all pictures within a folder:
- Choose Select Entire Folder.
- Click the Select Folder With Picture Files button.
- The Browse window appears allowing you to find the desired folder.

- Once the folder is selected, click OK to continue.
- Only pictures within the specified folder will be resized. Sub-folders are ignored (unless if you have the Process Sub-folder Images option set to "YES").
- Proceed to Resize Pictures.
If you wish to resize only certain pictures within a folder:
- Choose Select Individual Files.
- Click the Select Individual Files button.
- The Open window appears allowing you to find the folder containing the desired pictures.
- You may select multiple pictures by holding down the Ctrl key while clicking on each of the desired file names.

- You may select multiple pictures by holding down the Ctrl key while clicking on each of the desired file names.
- Once selected, click Open to continue.
- Proceed to Resize Pictures.
You may select pictures by dragging them from Windows Explorer and dropping them into QuickResizer.
- Start QuickResizer.
- Start Windows Explorer and find your pictures.
- You may select multiple pictures by holding down the Ctrl key while clicking on each of the desired file names.
- Click and hold down the left mouse button on the selected pictures.
- While holding down the left mouse button, drag the pictures from Windows Explorer and drop them onto QuickResizer’s Main Screen by releasing the left mouse button.
- The Main Screen will display the number of files selected. Hover over the number to see a list of the selected file names.

- Proceed to Resize Pictures.
Another way to run QuickResizer is to right-click in File Explorer:
- Right-click on a picture file (jpg, png, gif, ect) and choose "Open with", then "Choose another app":

- See if you can find QuickResizer on the list. If it is on the list, choose it. If not, scroll down and click on "More apps"
- If you can find QuickResizer on the list, choose it. If not scroll down and click on "Look for another app on this PC".
You can then browse to the location of the QuickResizer.exe file, which is usually located in
%ProgramFiles(x86)%\Ivertech\QuickResizer\
- Once it's selected, next time you can just right-click on the image file and choose "Open with" and QuickResizer will be available on the list:

- QuickResizer will automatically be opened with the selected file(s) ready to be resized.
| RESIZE PICTURES |
- Set the Resize Options
- If you wish to resize your picture(s) by a specific percentage:
- Choose Resize by Percent.
- Enter the desired percentage (1-500).
- If you wish to automatically rotate the pictures without changing their dimensions, you can just set the percentage to 100.
- If you wish to resize your picture(s) by a specific pixel size:
- Choose Resize to Fixed Size (Pixels).
- Enter the desired width (1-10000).
- Enter the desired height (1-10000).
-
Click the Resize Pictures button.
- A progress bar will display the number of files being resized.
- The original pictures are not modified during the resizing process (if you have the Overwrite Original Images set to "NO"). The resized pictures will be stored in subfolder called "Processed" located under the folder containing the original pictures.
- Once complete, Windows Explorer automatically launches and displays the resized pictures.
- QuickResizer resizes pictures in proportion to the original width and height. It will not stretch pictures out of proportion. Any leftover space will be replaced with a white background. You may change this background color as explained in the Advanced Options section.
- QuickResizer automatically saves your current settings and remembers them the next time you start the program.
| ADVANCED OPTIONS |
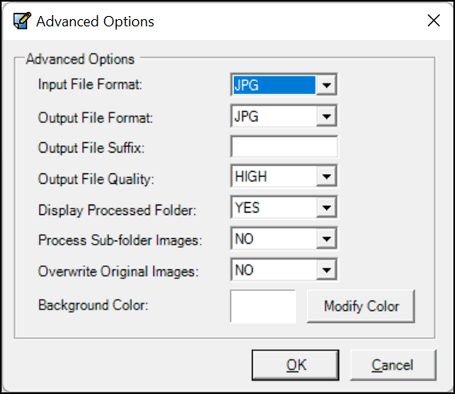
| INPUT FILE FORMAT / OUTPUT FILE FORMAT |
- JPG/JPEG
- GIF
- PNG
- BMP
- TIF/TIFF
| OUTPUT FILE SUFFIX |
| OUTPUT FILE QUALITY |
| DISPLAY PROCESSED FOLDER |
| PROCESSED SUB-FOLDER IMAGES |
| OVERWRITE ORIGINAL IMAGES |
| BACKGROUND COLOR |

| REMOVING QUICKRESIZER |
| MOVING YOUR LICENSE TO ANOTHER COMPUTER |
- Ensure that you are connected to the Internet.
- Click Help at the top of QuickResizer’s Main Screen.
- Click License Information.
- Click on the Unregister button to remove the license from your computer.

- You may now re-register QuickResizer on a different computer using the same user name and user key.
| HARD DRIVE RECOVERY |
| TESTIMONIALS |
If you would like to submit your testimonial after using our product, please submit your testimonial here.
| CONTACT US |

Thank you for your interest in QuickResizer.
Check out other great products here.
WE KEEP IT SIMPLE