
Batch Watermarker User's Guide
Introduction
 View Instruction Video View Instruction Video
|
Batch Watermarker can do the job for you!
Batch Watermarker is a powerful tool that helps you create watermark/overlay to protect your intellectual properties. Batch Watermarker can add watermarks (either image, text, or both) onto your graphic files in batches. All you need to do is to tell it where your graphic files are, what watermark logo/image or text to use, and Batch Watermarker will do the rest for you!
Below are some of the highlights of Batch Watermarker:
- Ability to add image and/or text watermark in folder mode or single file mode.
- Full control over the location of the watermark.
- Allow 10 different levels of image watermark opacity.
- Choose from 71 font families with different font styles, sizes, and colors.
- Create text watermark with solid color, chiseled, and three-dimensional text effect.
- Preview image before watermark is applied.
- Save processed files to a folder specified by user.
- The program remembers all settings set by user.
Installation
The installation file BatchWatermarkerSetup.exe can be downloaded from our Download page. After you have downloaded the BatchWatermarkerSetup.exe file to your computer, double-click on it to start the installation process.Batch Watermarker requires Microsoft .Net Framework 2.0 to run on your computer. If you have not installed Microsoft .Net Framework 2.0, the installation program will automatically download it for you. Since the installation file for Microsoft .Net Framework 2.0 is quite large (23 MB), it might take up to one hour to download if you have a dial-up Internet connection. It takes about 8 minutes to download for a DSL connection.
If you already have Microsoft .Net Framework 2.0 installed on your computer, the installation program will not download it again. It will install Batch Watermarker only. Since .Net Framework 2.0 is pre-installed with Windows Vista, you will not have to download .Net Framework 2.0 if you have Windows Vista.
You can check whether .Net Framework 2.0 is installed on your computer. If you prefer to download and install Microsoft .Net Framework 2.0 manually, please click here to download and install the Microsoft .Net Framework 2.0 installation file (dotnetfx.exe).
After you have downloaded Batch Watermarker's installation file, double-click on it to run it. The installation program will first download and install Microsoft .Net Framework 2.0 (if needed). Then it will install Batch Watermarker.
Once the installation process is completed, Batch Watermarker will automatically be launched. If Batch Watermarker is not launched automatically, you can launch the program by clicking Start, Programs, Batch Watermarker, Batch Watermarker. Or you can launch the program by double-clicking on the Batch Watermarker icon on your desktop.
Registration
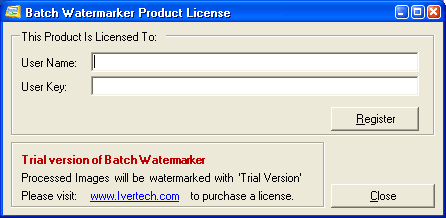
When Batch Watermarker first starts up, a Product License form will be displayed. If you do not have a User Name and a User Key, you can purchase them by clicking on the Buy Now link. After you purchase your User Name and User Key, you can enter them in the text boxes and click on the Register button. If you do not have the User Name and User Key but would like to try the program, click on the Close button to close the Product License form. All images that are processed with the evaluation version of Batch Watermarker will have the "Trial Version" watermark on them.
Make sure that you are connected to the Internet when you register. The registration process cannot be initiated if you are not connected to the Internet. If you get any errors during registration, you might want to try turning off any firewalls if they are on. You can turn them back on after you register. If you or your ISP (Internet Service Provider) is using proxy server to connect to the Internet, you might get an error during the registration process. The registration screen will then prompt you for the proxy server name and port number. If your proxy server requires a user name and password, you can enter them there too.
You can use the User Name and User Key only once. The User Name and User Key cannot be re-used after you have registered with us. Please do not share them with others. If you need to move your license from one computer to another, you can perform the "un-registration" process. To un-register your license, you will need to go to Help, License Information menu item on the main screen. Click on the "Unregister" button and your license will be removed from your current computer. Make sure that you are connected to the Internet when you un-register. After the un-registration process is completed successfully, you can then register the product on a different computer.
If your computer crashes and you need to re-register the program on your computer after you reformat your hard drive, you can write us an email with your User Name and we will reactivate your license for you.
Main Screen
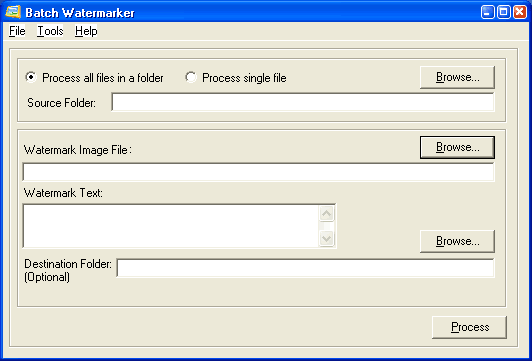
The next screen is the main screen for Batch Watermarker. You can select the source folder or file, watermark image or text, and process the images here. You can also preview your image by selecting the Tools, Options menu item.
Process All Files in a Folder
If you would like to process all image files in a folder, please select the "Process all files in a folder" option. You can then type in or browse to the path of the images where you would like to create watermarks for. The path is referred to as "Source Folder" on the screen.
Process Single File
If you would like to create watermark for one single file, please select the "Process single file" option. You can then type in or browse to the image file where you would like to create watermarks for. The path is referred to as "Source File" on the screen.
Image formats supported by Batch Watermarker are: bmp, emf, exif, gif, ico, jpe, jpeg, jpg, png, tif, tiff, and wmf. Batch Watermarker does not process any other image formats that are not mentioned above. If an animated file is supplied, Batch Watermarker will process only the first frame.
Watermark Image or Text
After you have specified the Source Folder or Source File, you need to tell Batch Watermarker what watermark image or text to apply to your source images. You can provide both the image and the text for your watermark. The positions of the image or text can be set in the Tools, Options menu item (this will be explained later). You can provide just the image or just the text. However, you cannot leave both the "Watermark Image File" and "Watermark Text" text boxes empty.
You can either type in or browse to the watermark image file. Batch Watermarker knows how to render transparent gif file. The transparent portion of the gif file will stay transparent, revealing the source image behind it. Watermark image formats supported by Batch Watermarker are: bmp, emf, exif, gif, ico, jpe, jpeg, jpg, png, tif, tiff, and wmf. If an animated watermark file is supplied, Batch Watermarker will process only the first frame.
You are allowed to enter multiple lines of text in the "Watermark Text" text box. Batch Watermarker knows how to render carriage return (the "Enter" key). You can also type special characters (like ©, ®, etc) into the text box. They will be rendered properly in the processed images.
Destination Folder
Destination Folder is an optional field and it can be left empty. If you leave it empty, the program will automatically create a folder called "Processed" under the Source Folder and your processed images will be saved there. If you would like your processed images to be saved in a different folder, you can either type it in or use the "Browse" button to browse to the folder. If you make your Destination Folder the same as your Source Folder, your original source images will be replaced by the processed images (with watermarks). To force Batch Watermarker to always create a "Processed" folder under the Source Folder, we recommend that you leave the Destination Folder text box empty. This will prevent your original images from being accidentally overwritten.
Process Button
Once you have input your source folder/source file and watermark image/text, you are ready to start the process. Just click on the "Process" button and watch Batch Watermarker do the work. A progress bar will be displayed to show you which file it is processing. Once the process is completed, a link that says "View images in Destination Folder" will be displayed under the Destination Folder text box. You can click on the link to browse to the folder where the processed images are saved.
Options Screen
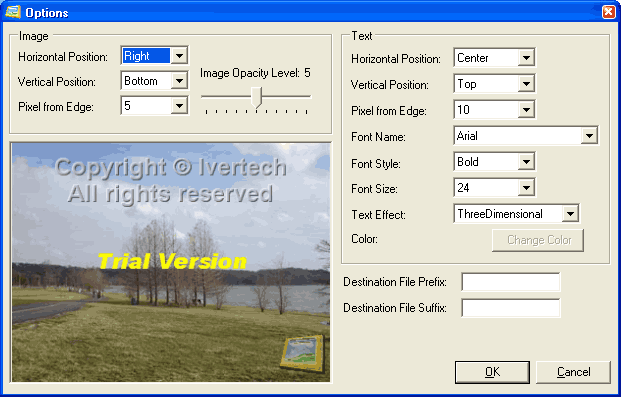
You can get to the Options Screen from the Main Screen by clicking on the "Tools, Options" menu item. The Options Screen allows you to set different settings of the watermark. It also allows you to preview the watermark before the image is processed. All the settings will be saved if you click on the "OK" button after changing the settings. The settings stay the same if you click on the "Cancel" button.
Preview Image
If you would like to preview your source image before it is processed, you will need to choose the "Process single file" option on the Main Screen. Once you have picked the source file, the watermark image or text, click on the "Tools, Options" menu item and you will be able to preview the source image with the watermark image or text that you specified. You can then change different settings on the Options Screen (like moving the position of the image watermark or changing the font size of the text watermark) and the image will be rendered on the fly to show you how it will look like when you actually process it.
If you would like to process all files in a folder after you have previewed a source image, you will need to select the "Process all files in a folder" option and select the folder location before you click on the "Process" button. There is no option to preview multiple source images at the same time. You will need to preview one image at a time.
If you leave the "Source Folder/Source File", "Watermark Image File" and Watermark Text" fields empty when you click on the "Tools, Options" menu item, a generic source image and watermark will be displayed. You can still change the settings on the Options Screen and preview your changes on the fly. Click on the "OK" button to commit your changes or "Cancel" to cancel your changes.
Image Watermark
If you have specified a "Watermark Image File" from the Main Screen, you can control the position of the watermark on the Options Screen. You can specify the Horizontal Position (Left, Center, and Right) and Vertical Position (Top, Middle, and Bottom) of the watermark. You can also specify how far (in pixels) from the edge of the source image you would like to place the watermark. You can also change the opacity of the watermark from 0 to 10. If you set the opacity to 0, the watermark image will be totally transparent and you will not be able to see it. If you set it to 5, the watermark will be semi-transparent. The watermark will be completely opaque (solid) if the opacity level is set to 10. Try different settings and preview the image dynamically to find out what suits your taste.
Below are samples of 3 different Image Opacity Levels:
 |
 |
 |
| Opacity Level 2 | Opacity Level 5 | Opacity Level 10 |
Text Watermark
If you type in any text in the "Watermark Text" text box from the Main Screen, you can control the Horizontal Position, Vertical Position, and Pixels from Edge of the text watermark on the Options Screen. You can also choose the Font Name (71 font families available), Font Style (Regular, Bold, Italic, Underline, and Strikeout), Font Size, Text Effect (SolidColor, Chiseled, and ThreeDimensional), and Font Color of the text. Font color is applicable only when you choose "SolidColor" as the Text Effect. For Chiseled and ThreeDimensional Text Effects, the color will always be grey.
Below are samples of how each Text Effect looks like:
 |
 |
 |
| SolidColor | Chiseled | ThreeDimensional |
Destination File Prefix/Suffix
If you would like to name your processed files differently from the original source files, you can specify the prefix or suffix in the Destination File Prefix and Destination File Suffix fields. For example, if your original source image file is named "Picture1.jpg" and you specified "Watermark_" in the Destination File Prefix field, your processed file will be named "Watermark_Picture1.jpg". If you specified "_Watermark" in the Destination File Suffix field, your processed file will be named "Picture1_Watermark.jpg". You can specify both Prefix and Suffix at the same time. If you would like your processed files to be named the same as the original source files, just leave the fields empty.
Help
If you need help using Batch Watermarker, click on the Help menu on the main screen and choose User's Guide menu item. You need to have Internet connection to view the online User's Guide.Uninstallation
If for any reason you need to uninstall Batch Watermarker, you can go to Start, Programs, Batch Watermarker, Uninstall Batch Watermarker. Follow the instructions to uninstall Batch Watermarker.| Supported Hardware |
| Intel/AMD processor. |
| Supported Operating Systems |
|
Microsoft Windows 11 Microsoft Windows 10 Microsoft Windows 8 Microsoft Windows 7 Microsoft Windows Vista Microsoft Windows XP |